


Create the classic Snake game - React I
Start from scratch (Create-React-App, Typescript, React Hooks)
Posted
Updated
A while ago I was looking for a cable in the famous cable box, which I guess everybody has in his garage||closet||somewhere, and I have found an old Nokia phone. Remember the classic SNAKE game? Childhood Memories come alive. 😊 Let's build it in React with React Hooks, Typescript and a toolchain (Create-React-App).
This tutorial consists of two parts:
💰 The Pragmatic Programmer: journey to mastery. 💰 One of the best books in software development, sold over 200,000 times.
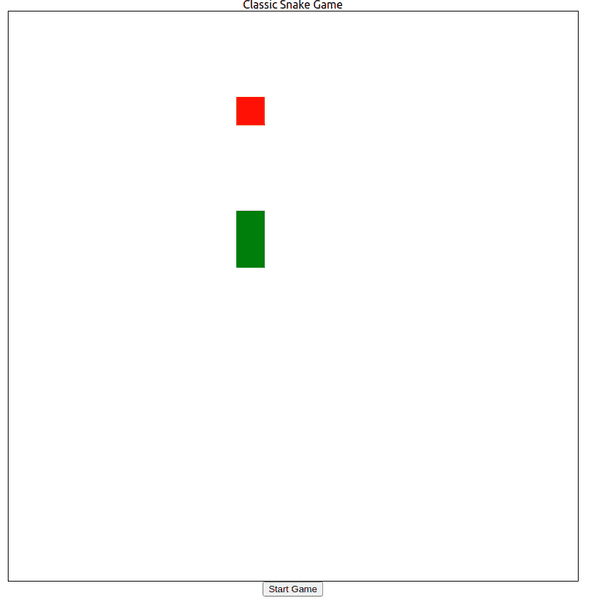
The final game will look like this:
Table of Contents - Part I
1. Create React App
Let's create a new React app with a toolchain. If you don't know what a toolchain is, please refer to the React docs here.
I am going to use Create-React-App, have a look on github.
The name of the app will be react-snake and I want to use Typescript, so I have to add the typescript template flag.
Create a React app with this command in your terminal.
npx create-react-app react-snake --template typescript2. Add prettier (optional)
For basic code formatting, I'd like to add prettier. Prettier is an opinionated code formatter. Have a look at prettier.io. It does basically this:
Prettier takes your code and reprints it from scratch by taking the line length into account.
Install prettier as a dev dependency:
npm install --save-dev --save-exact prettierCreate a config file for Prettier. It should be named .prettierrc and located in project root.
touch .prettierrcThen copy this into your config file to have a basic styling, more options avalaible here.
{
  "endOfLine": "lf",
  "semi": true,
  "singleQuote": true,
  "tabWidth": 2,
  "trailingComma": "all",
  "printWidth": 70
}
3. Add Game Constants and Game Interval
Remove the demo code in App.tsx. It should look like this.
import React from 'react';
import './App.css';

function App() {
  return <div>Classic Snake Game</div>;
}

export default App;
Create a file for constants - constants.tsx.
touch constants.tsxCopy/paste this starter code:
export const canvas_size = { x: 800, y: 800 };
export const snake_start = [{ x: 8, y: 7 }, { x: 8, y: 8 }];
export const direction_start = { x: 0, y: -1 };
export const apple_start = { x: 8, y: 3 };
export const scale = 40;
export const initial_speed = 200;
export const directions = {
  ArrowUp: { x: 0, y: -1 },
  ArrowDown: { x: 0, y: 1 },
  ArrowLeft: { x: -1, y: 0 },
  ArrowRight: { x: 1, y: 0 },
};
Every game needs a game loop. It's the central part of the game engine and is responsible for balancing the logic of the game and the drawing on the canvas.
In good-old Vanilla JavaScript, we would use the setInterval method to do this. Unfortunately, with React hooks this is not possible. Read here why setInterval needs to be declarative Dan Abramov.
Hence, we have to create a useInterval React Hook.
touch useInterval.tsxCopy/paste this code:
// Custom Hook by Dan Abramov, https://overreacted.io/making-setinterval-declarative-with-react-hooks/
// TypeScript Added by Mario Kandut

import { useEffect, useRef } from 'react';

export function useInterval(callback: any, delay: number | null) {
  const savedCallback = useRef<() => void | null>();

  // Remember the latest callback.
  useEffect(() => {
    savedCallback.current = callback;
  }, [callback]);

  // Set up the interval.
  useEffect(() => {
    function tick() {
      if (typeof savedCallback?.current !== 'undefined') {
        savedCallback.current();
      }
    }
    if (delay !== null) {
      let id = setInterval(tick, delay);
      return () => clearInterval(id);
    }
  }, [delay]);
}
That's now a great starting point.
4. Game Logic
We import the React hooks we want to use, useState, useEffect, useRef and the custom hook useInterval, as well as our game constants constants into App.tsx.
import React, { useState, useEffect, useRef } from 'react';
import { useInterval } from './useInterval';
import {
  canvas_size,
  apple_start,
  directions,
  scale,
  snake_start,
  initial_speed,
  direction_start,
} from './constants';
import './App.css';
The movement of the snake on the canvas should be controllable with the arrow keys.
To be able to do this, we have to listen to keyboard events and assign a role="button" to this div.
We can create now the game canvas in App.tsx.
<div className="wrapper">
  <div>Classic Snake Game</div>
  <div
    className="controls"
    role="button"
    onKeyDown={(event: React.KeyboardEvent) => moveSnake(event)}
  >
    <canvas
      style={{ border: '1px solid black' }}
      ref={canvasRef}
      width={canvas_size.x}
      height={canvas_size.y}
    />
    <button onClick={startGame}>Start Game</button>
  </div>
</div>
We create the missing canvasRef:
const canvasRef = useRef<HTMLCanvasElement>(null);Now we create the empty moveSnake and startGame function, so we don't get errors or warnings.
const moveSnake = (event: React.KeyboardEvent) => {};
const startGame = () => {};
We can start to show something on the screen - the snake and the apple.
useEffect(() => {
  const context = canvasRef.current?.getContext('2d');
  if (context == null) throw new Error('Could not get context');
  context.setTransform(scale, 0, 0, scale, 0, 0);
  context.clearRect(0, 0, canvas_size.x, canvas_size.y);
  // Draw Snake
  context.fillStyle = 'green';
  snake.forEach(({ x, y }) => context.fillRect(x, y, 1, 1));
  // Draw Apple
  context.fillStyle = 'red';
  context.fillRect(apple.x, apple.y, 1, 1);
}, [snake, apple]);
The if(context === null) is necessary, since getContext can return null, refer to MDN.
So basically, we scale the 2D-context and draw the canvas. Then we draw green rectangles for the snake and red rectangles for the apple.
Game Controls
Now we can start interacting with the snake. Let's implement the function for the game controls.
First, we have to add an interface for coordinates:
export interface ICoords {
  x: number;
  y: number;
}
Add the useState for directions:
const [direction, setDirection] = useState<ICoords>(direction_start);Update the moveSnake function.
const moveSnake = (event: React.KeyboardEvent) => {
  const { key } = event;
  // only if arrow key move
  if (
    key === 'ArrowUp' ||
    key === 'ArrowDown' ||
    key === 'ArrowRight' ||
    key === 'ArrowLeft'
  ) {
    setDirection(directions[key]);
  }
};
Game Loop
Let's create the game loop:
const gameLoop = () => {
  const snakeCopy = [...snake]; // Create shallow copy to avoid mutating array
  const newSnakeHead: ICoords = {
    x: snakeCopy[0].x + direction.x,
    y: snakeCopy[0].y + direction.y,
  };
  snakeCopy.unshift(newSnakeHead);
  setSnake(snakeCopy);
};
To avoid errors and warning for now, we need to create to empty functions:
const checkCollision = (
  piece: ICoords,
  snoko: ICoords[] = snake,
) => {};
const checkAppleCollision = (newSnake: ICoords[]) => {};
With the imported useInterval hook, we can trigger the game loop. Put the following line before the return statement.
useInterval(() => gameLoop(), speed);Right now, nothing will move, because speed is NULL. Try to manually change speed to 1000 and see if the snake moving.
Now we can add the startGame function, and the missing states for the snake, apple, speed and gameOver.
const [snake, setSnake] = useState<Array<ICoords>>(snake_start);
const [apple, setApple] = useState<ICoords>(apple_start);
const [speed, setSpeed] = useState<number | null>(null);

const startGame = () => {
  setSnake(snake_start);
  setApple(apple_start);
  setDirection(direction_start);
  setSpeed(initial_speed);
};
Since we have a startGame function, we should have an endGame function as well:
const endGame = () => {
  setSpeed(null);
};
Collision Detection
The collision detection needs to handle three use cases:
- snake collides with border of the canvas
- snake collides with itself
- snake collides with the apple
First we handle if the collision is with the border. The coordinates for the canvas border we have canvas_size.
const checkCollision = (piece: ICoords, snoko: ICoords[] = snake) => {
  // Wall Collision Detection
  if (
    piece.x * scale >= canvas_size.x ||
    piece.x < 0 ||
    piece.y * scale >= canvas_size.y ||
    piece.y < 0
  ) {
    return true;
  }

  return false;
};
Now we have to detect if the snake collides with itself. Therefore, we check if the coordinates of a segment of the snake, and the current piece are the same.
Hence, we add this into checkCollision:
// Snake Collision Detection
for (const segment of snoko) {
  if (piece.x === segment.x && piece.y === segment.y) return true;
}
Then we need to add the condition for triggering the collision detection. Add this line in the gameLoop after unshifting the snakeHead.
if (checkCollision(newSnakeHead)) endGame();We have to detect now if the snake collides with an apple and create a random apple. Let's make the checkAppleCollission function:
const checkAppleCollision = (newSnake: ICoords[]) => {
  if (newSnake[0].x === apple.x && newSnake[0].y === apple.y) {
    let newApple = createRandomApple();
    while (checkCollision(newApple, newSnake)) {
      newApple = createRandomApple();
    }
    setApple(newApple);
    return true;
  }
  return false;
};
Create the random apple:
const createRandomApple = () => {
  return {
    x: Math.floor((Math.random() * canvas_size.x - 10) / scale),
    y: Math.floor((Math.random() * canvas_size.y - 10) / scale),
  };
};
Add the checkAppleCollission to the gameloop with inserting this line after the if forcheckCollission:
if (!checkAppleCollision(snakeCopy)) snakeCopy.pop();Now some basic styling in App.css:
.wrapper {
  display: flex;
  justify-content: center;
  align-items: center;
  flex-direction: column;
}

.controls {
  display: flex;
  justify-content: center;
  align-items: center;
  flex-direction: column;
}
Click the start button and try to see if it's working.
The current state of your React-Snake should look like this:
Continue with Styling - Part II
Newsletter Signup
Never miss an article.