

How to write a custom ESLint rule
Customize ESLint and enforce a specific rule
Posted
Updated
This article is based on ESLint v8.28.0.
ESLint is the default linting tool in the JavaScript/TypeScript ecosystem. ESLint runs continuously a set of rules to detect issues, and, depending on the rule, it allows you to automatically fix the issue. These rules can be imported from other projects or extended to your needs. At some point you might have a case which is not covered with one of the already existing ESLint plugins, then you have to write your own plugin.
💰 The Pragmatic Programmer: journey to mastery. 💰 One of the best books in software development, sold over 200,000 times.
This article is about how you can write your own custom plugin for ESLint. Before you start, check out the quick refresher - what is linting.
Writing a custom ESLint rule
To use a custom rule in ESLint, you have to write an ESLint plugin. Before you start writing your own plugin, check the already existing ones here. ESLint offers a flexible architecture for plugins and is completely pluggable. The parser and the rules are all pluggable, this means, that you can adjust it to your needs. If you want to use TypeScript or JavaScript or use different plugins for naming functions, etc. The possibilities are endless.
Before starting to write the custom rule, we have to understand how ESLint works and how we can check if the rule is working. Any linter, TSLint or ESLint is basically a basic static code analyzer, it checks your source code for programmatic and stylistic errors (wrong indentation, variable naming, ...). ESLint uses an AST (Abstract Syntax Tree) to evaluate patterns in code. AST (Abstract Syntax Tree) is used for describing a particular syntax pattern in your code, see the example AST below.

So, basically, we have to find the node of our code we want to check in the AST and return it to ESLint. Hence, we have a plan.
Three steps to create a custom ESLint rule
- Create rule definition in AST explorer
- Create module with custom rule
- Import custom module into ESLint
1. Create custom rule in AST explorer
For demonstration purposes, we are going to write a simple rule. We want to forbid a variable named pizza, isPizza or any other combination is okay.
We open a browser tab and go to AST.
Now we have to configure the parser and transformer.
Depending on your projects ESLint configuration, you have to select the parser, for example @typescript-eslint/parser, if you are using typescript and are using this parser.
Use the ESLint v8 option in the transform, since we don't want to use TypeScript in our ESLint rule.
Now you will have four windows, instead of two.
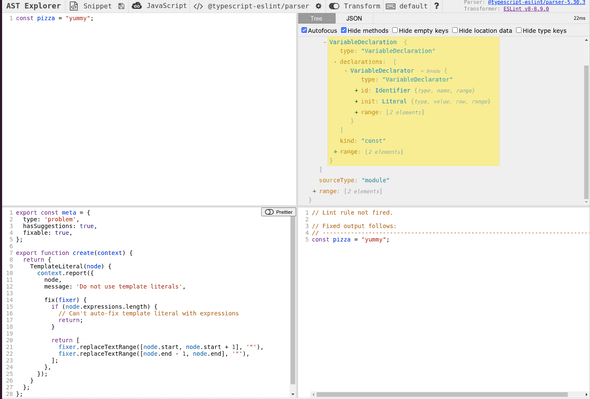
The top left one is the code to lint, the top right one is the abstract syntax tree, the bottom left is your rule definition and the bottom right is the rule output.
Now, let's explore the AST to find name: "pizza". This is the property we want to check.
Let's console log it.
Copy the code in the bottom left rule definition and open dev tools console. The output should be pizza.
module.exports = {
  create(context) {
    return {
      Identifier(node) {
        console.log(node.name);
      },
    };
  },
};
Now we just have to check if the name is pizza.
module.exports = {
  create(context) {
    return {
      Identifier(node) {
        if (node.name.toLowerCase() === 'pizza') {
          console.log(
            `Nope, the variable name '${node.name}' is reserved`,
          );
        } else {
          console.log(`'${node.name}' is an amazing variable name`);
        }
      },
    };
  },
};
Now, let's add more test cases to verify our code is correct. Copy and paste the code into the top left window.
const pizza = 'yummy';
const isPizza = true;
const pizzaSize = 'large';
The output in the console should be ... is an amazing variable name for isPizza and pizzaSize.
That is Great. We have identified the pattern, which violates our custom rule.
To report the violation of the rule we have to use context.report(), see ESLint docs.
It publishes a warning or error depending on the configuration being used. The object accepted by context.report(), has a required message property, which contains the message that will be reported.
Now,let's extend the code.
module.exports = {
  create(context) {
    return {
      Identifier(node) {
        if (node.name.toLowerCase() === 'pizza') {
          return context.report({
            node,
            message: 'Nope, the variable name "pizza" is reserved',
          });
        }
        return null;
      },
    };
  },
};
The output (bottom right) should be something like this:
// Nope, the variable name "pizza" is reserved (at 1:7)
const pizza = 'yummy';
// ------^
// ...
Our rule definition is now done. Additionally, the method context.report() also has an optional property fix, which would allow us to define a function which applies a fix for the rule violation.
Though, this will be covered in another blog post. 😀
2. Create module with custom rule
Create a project with corresponding folders and files, and initialize with npm init -y.
mkdir eslint-custom-rules
cd eslint-custom-rules
npm init -y
touch index.js
mkdir rules
cd rules
touch pizza-reserved.js
We will need this later to upload the module or import it into our project.
Add the rule definition in the file pizza-reserved.js.
module.exports = {
  create(context) {
    return {
      Identifier(node) {
        if (node.name.toLowerCase() === 'pizza') {
          return context.report({
            node,
            message: 'Nope, the variable name "pizza" is reserved',
          });
        }
        return null;
      },
    };
  },
};
There are naming restrictions for creating custom eslint rules. Following formats are allowed, where plugin-name and scope can be customized:
- eslint-plugin-
plugin-name - @
scope/eslint-plugin-plugin-name - @
scope/eslint-plugin
For this example we choose eslint-plugin-pizza-reserved for the npm module.
We have to update the package.json in our index.js file with the name eslint-plugin-pizza-reserved.
The package.json should look like this:
{
  "name": "eslint-plugin-pizza-reserved",
  "version": "1.0.0",
  "description": "",
  "main": "index.js",
  "scripts": {
    "test": "echo \"Error: no test specified\" && exit 1"
  },
  "keywords": [],
  "author": "",
  "license": "ISC"
}
Now we update our index.js files to export the rules.
module.exports = {
  rules: {
    'pizza-reserved': require('./rules/pizza-reserved'),
  },
};
Now we have a working custom eslint rule. We can now publish is to npm or only use it locally in our project.
3. Import custom module into ESLint
The import of the custom rule into your ESLint configuration depends on if you have published the rule or if you want to use it locally.
If you use the ESLint rule locally in your project, you can simply extend your package.json devDependencies with "<plugin-name>": "file:path/to/entrypoint".
The folder structure in this example is:
.
├── eslint-custom-rules     # Custom ESLint rules
|   ├── rules
|   |   └── pizza-reserved.js
|   └── index.js
|
└── my-project               # Project folder, where we want to use custom rules
    ├── src                  # Source files
    ├── test                 # Automated tests
    ├── .eslintrc.js         # Automated tests
    ├── ...                  # Automated tests
    └── README.md
Hence, use "eslint-plugin-custom-rules": "file:eslint-custom-rules" to add your custom eslint plugin to package.json and run npm i to install it.
The final step would be to extend the ESLint configuration.
module.exports = {
  plugins: [
    'custom-rules',
    // other plugins
  ],
  rules: {
    // other configs
    'custom-rules/pizza-reserved': 'warn',
  },
};
That's it. You have written a custom ESLint rule. Congratulations.
TL;DR
- To create a custom ESLint rule you have to create a custom ESLint plugin.
- First you have to define the rule definition with the AST explorer.
- Then you have to create an NPM module with the custom rule
- Finally, you have to install the custom module in your project and add it into your ESLint configuration.
Thanks for reading and if you have any questions, use the comment function or send me a message @mariokandut. If you want to know more about typescript, have a look at these Typescript Tutorials.
References (and Big thanks): ESLint, Darragh ORiordan, Carrie Reid-Knox, MEWS - Daria
Newsletter Signup
Never miss an article.